Showing posts with label Fantasy. Show all posts

CREATE A VIBRANT NIGHT SCENE


Open a new 2268 x 3289px document at 300px/inch. Place the background and create a new layer. Pick your Bokeh brush from the disc with 30% Opacity and apply it gently onto the canvas. Select this layer, group it and set it to Linear Dodge blending mode. Download the model 7063838 and background 3233765 from www.depositphotos.com.


DARKEN THE BACKGROUND
Apply a Hue/Saturation adjustment layer. Set the blending mode to Multiply and the Opacity at 50%. Now add a Curves adjustment. Create a point on the graph and choose 70 for the Output and 110 for the Input. Finally, add a Selective Color adjustment layer. Pick your whites and apply 100% for black, then pick your blacks and apply 15% for black too.


CREATE THE GLASS WINDOWS
Choose the Rectangle tool (U) and draw two white rectangles. For the left one, apply an Inner Shadow layer style. Choose a Color Dodge blend mode at 75% Opacity, -135° Angle, 23px Distance, 12% Choke and 3px Size. For the right one, apply another Inner Shadow layer style but with 139° Angle, 0px Distance, 10% Choke and 10px Size. Set both of the layers to Soft Light with 50% Opacity.


ADD VIBRANT COLOURS
For the left window, go to Layer>New Fill Layer>Solid Color. Choose #00adff and set the blend mode to Hue. Repeat this for the window on the right but with #ff005a. Select your layer mask thumbnail and grab a large eraser at 0% Hardness. Make sure your colours are set to default by pressing D and erase the left half of the image. To switch between the two colours, press Shift+X.


CREATE THE FLOOR
From your Tools palette, you need to select the Ellipse tool (U) and draw a black oval at the bottom of the artwork to make the floor. Then add a new layer style to this ellipse by going to Layer> Layer Style>Inner Shadow. The colour should be set to #00adff, with a Normal blending mode, 70% Opacity, Angle at -135°, Distance set at 15px and Size at 50px.


PLACE THE MODEL AND FABRIC
Extract your model from the background. Download the fabric from http://fav.me/d4b95oa. Place your fabric image below the layer of the model and extract it as well. Create a new layer and paint with a small, soft, round, black brush on low flow and opacity to make a shadow. If you think it’s too hard, reduce the opacity of the layer. This last layer should be between the model’s body and fabric.


" If you want to switch quickly between your foreground and
background colours, press Shift+X "


MAKE THE FABRIC BLACK
Create a new Hue/Saturation adjustment layer. Set the Saturation of the layer to -100 and clip it to the fabric layer. Duplicate this layer above and set this to Multiply. Then duplicate that layer and set the Opacity to 50%. You’ll see that the flying fabric is now a black colour and perfectly blended with the colour of the dress.


BLEND THE MODEL
Cmd/Ctrl-click on your model layer’s thumbnail, then create a new layer at the top, select a soft brush and paint the edges on the left in bright blue and the edges on the right in pink. Use a smaller brush and create a new layer. Paint on the highlights of the fabric lines. You can set the blending mode to Soft Light if the result is too hard. 


EXTRA HAIR
A graphics tablet is highly recommended for painting things like hair. Create a new layer behind the model. Select the color #4f2e17 and then paint the main hair shape using a brush. Create another new layer on top and start painting the extra details of the hair. This is the colour palette that we used: #daa988, #af6f44, #623d21 and #393026. They are in order from the brightest to the darkest shade of colour.


DEPTH AND DETAILS
Create a new layer and set it to Soft Light. Pick a soft brush and paint the shadows in black and highlights in white. Create a new layer on top and set the blending mode to Screen. Pick the colour #00adff and choose 30% for the Opacity of the brush. Paint the folds of the fabric. You can also use a very large brush and paint general light around the edges to add more glow. Do the same in pink #ff005a on the right side of the dress.


MORE MAGIC
You will be painting in black and white only. Create a new layer at the top, set the blending mode to Overlay and paint the edges of the dress and left side of the model in white as well as some small details such as highlights on the hair, legs and arms. Always explore with blend modes – the changes are non-destructive, and you can always revisit your blend mode settings and readjust them as needed without damaging your original image.


OPTICAL FLARES
Open the optical flare images on your disc (‘Optical-8b-psdbox.jpg’ and ‘Optical-8c-psdbox.jpg’) and drag them onto the canvas. Organise and resize them as shown in the image and set their blending modes to Screen. Blur the one at the bottom with Filter>Blur>Gaussian Blur using a value of your choice. It’s preferable to change the blending mode before moving such images, because you’ll be able to see better where they would be placed.


REFLECTION
Duplicate the model’s layer. Ctrl/right-click on the layer mask thumbnail and choose Apply Layer Mask. Select the right hand and part of the arm with the Rectangular Marquee tool (M), press Cmd/Ctrl+Shift+I to invert the selection and keep the hand only. Delete the selection then press Cmd/ Ctrl+D to deselect. Press Cmd/Ctrl+T, then Ctrl/ right-click anywhere on your canvas and choose Flip Horizontal. Move it to the right so it’s symmetrical with the model’s original hand. Set the blend mode to Soft Light and make the Opacity of the layer 50%.


♦ QUICK TIP
Commonly used blend modes are Multiply, Screen, Soft Light and Overlay. Multiply is mostly used to darken, but you can use it to remove whites from an image or to extract a black subject from a white background. Screen does the opposite. Overlay and Soft Light are almost the same. They use a mix of Screen on the lighter pixels and Multiply on the darker pixels. The difference is that Overlay is harder.


FLOOR REFLECTION
Select all your layers by pressing the first one, holding Shift and pressing the last one. Go to Layer>Duplicate Layers then hit Cmd/Ctrl+E to merge them. Press Cmd/Ctrl+T, then Ctrl/right-click and choose Flip Vertical. Move the image to the bottom of the model’s dress. Move the layer to place it above the ground layer of step 5. Create a layer mask and gently erase the bottom so it looks faded. 


FINAL EFFECT
Create a new layer on top of all the layers. To fill it with white, press Cmd/Ctrl+Backspace, making sure that your colours are set to default by pressing D. Go to Filter>Lens Correction and select the Custom tab. On the Vignette part, choose -40 and click OK. Set the blending mode to Multiply to apply only the black colour. Finally, duplicate this last layer and you’re done!

Mixced media portraits


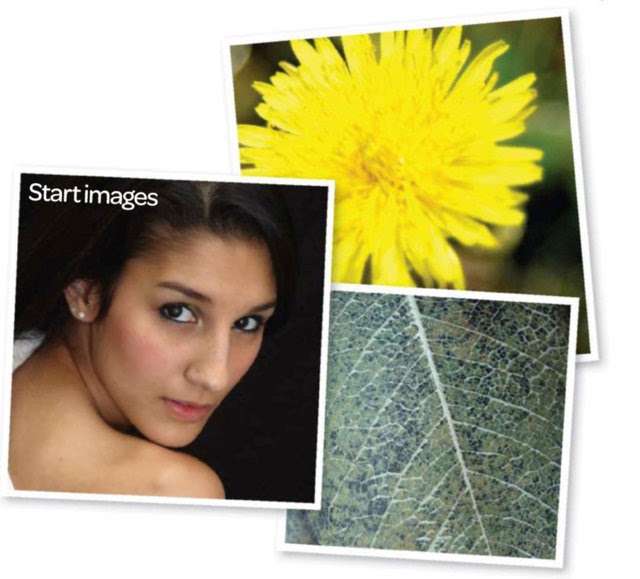
start images

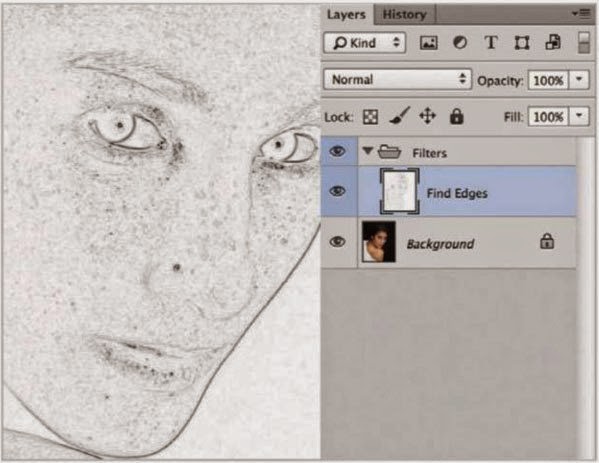
Find Edges
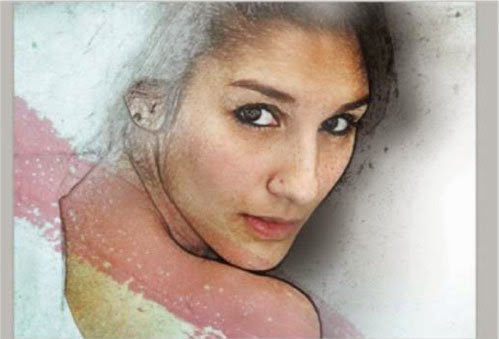
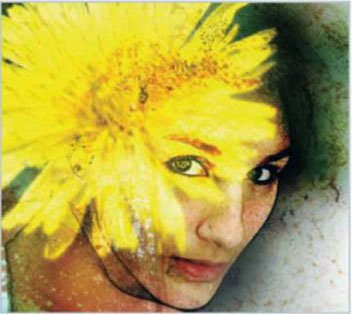
Open 'Start.psd' from the supplied files. Press Cmd/Ctrl+J to duplicate the layer, then go to Filter>Stylize>Find Edges. To banish the colour, press Cmd/ Ctrl+Shift+U, a shortcut for Desaturate.


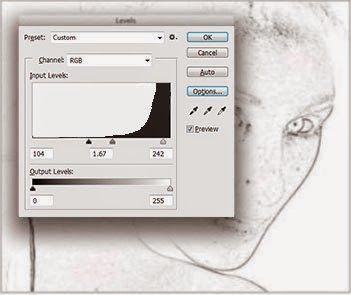
Levels
Press Cmd/Ctrl+L to bring up Levels. Slide the Shadows slider inward to strengthen the lines, and drag the Highlights slider inward to remove intermediate detail. Click OK when done.


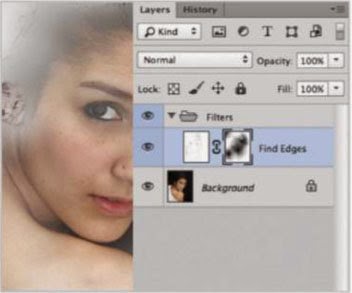
Mask it
Add a layer mask with the icon in the Layers palette. Set Foreground to black. With a soft, round brush at 80% opacity, paint in the mask in the facial. shoulder; and upper left areas.


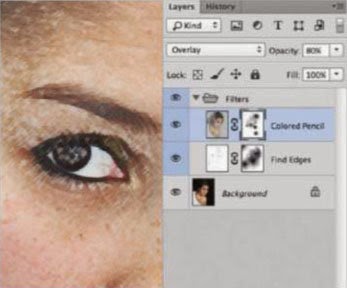
Colored Pencil
Duplicate the Background layer and move to the top. Go to Filter> Artistic-Colored Pencil. Use these settings: 7. 14,38. Click OK. Set Opacity to 80%. Use a mask to paint out some of the effect.


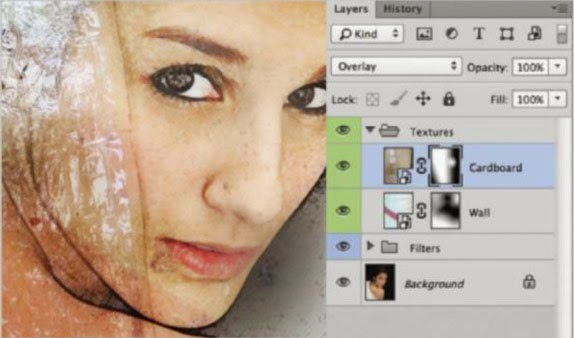
Museum wall
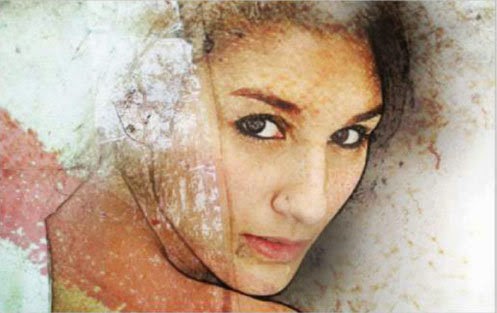
Go to File>Place, add 'Wall.jpg' from the supplied files. Set the blend mode to Multiply. Add a layer mask and paint out some of the texture, especially in the facial area.


Some old cardboard
Go to File>Place, add 'Caroboardjpg' from the supplied files. Set the blend mode to Overlay. Add a layer mask and paint out some of the texture in the right side and the bottom left.


The family sofa
Now place 'Sofajpg' from the supplied files. Set the blend mode to Color Burn and drop Opacity to 50%. Add a layer mask and paint out some of the texture, especially inthe facial area.


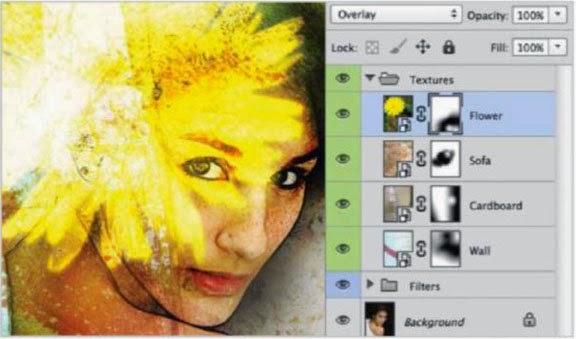
Add a flower
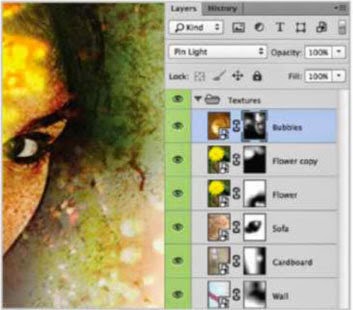
Next, place 'Flowerjpg' Set the blend mode to Overlay. Add a layer mask to paint out some of the bottom-right area. We need to boost the flowers presence, so we'll duplicate in the next step.


Flower power
Press Crnd/Ctrl-J to duplicate the flower. Change the blend mode to Multiply. This will darken a lot of the area. Click the mask and paint black in those areas. Keep the flower intact.


Borrow some bubbles
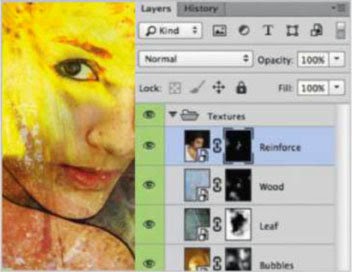
Next, place 'Bubblesjpg'. Set the blend mode to Pin Light Opt/ Alt+Click the Layer Mask icon. Set Foreground colour to white, then paint in areas to add a light presence of the bubbles.


Leaf veins
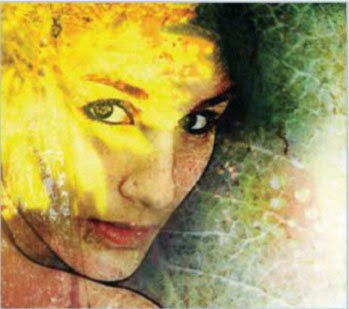
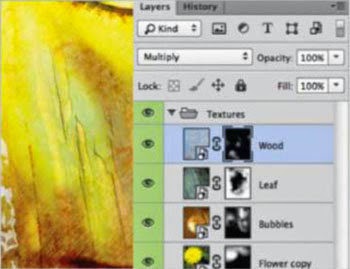
Place 'Leaf.jpg' from the supplied files. Set the blend mode to Overlay. Add a layer mask,set Foreground colour to black, and paint out some of the texture. especially in the facial area and the upper flower area.


Old wooden plank
Now place 'Woodjpg' from the supplied files. Set the blend mode to Multiply. Opt/Alt+click the Layer Mask icon. Carefully paint white in select areas such as the cheek and back/shoulder area to add a touch of wood texturing.


Reinforce the model
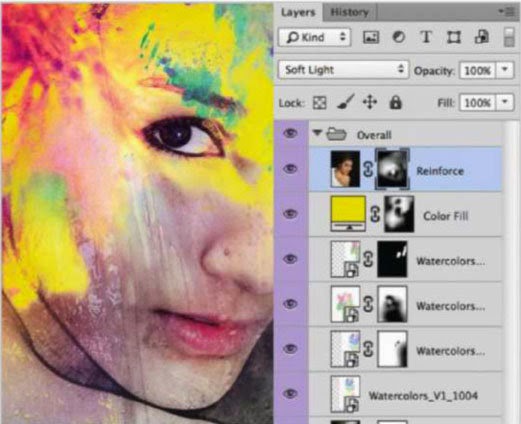
Make a duplicate of the background and move it to the top. Option/ Alt-click the Layer Mask icon. Paint white in a few select areas to reinforce the original model and override the barrage of textures. Be sure to touch the eyes.


Vibrance
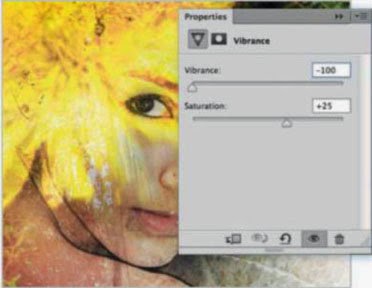
Click the Create New Adjustment Layer button in the Layers palette; choose Vibrance. Drag Vibrance all the way to the left and increase Saturation to +25. Paint black in select areas to restore colour.


Color Balance
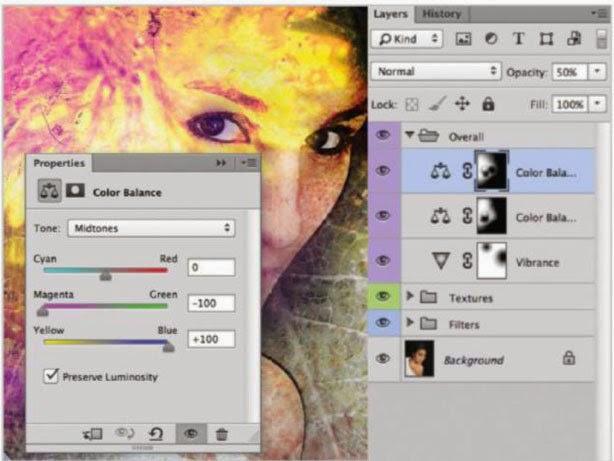
Click the Create New Adjustment Layer button in the Layers palette, choose Color Balance. Set Midtones to (top to bottom) 0, -100, +100. Paint black in the right and select areasto remove the adjustment. Duplicate the adjustment layer and fine-tune the mask until happy.


Drain surrounding colour
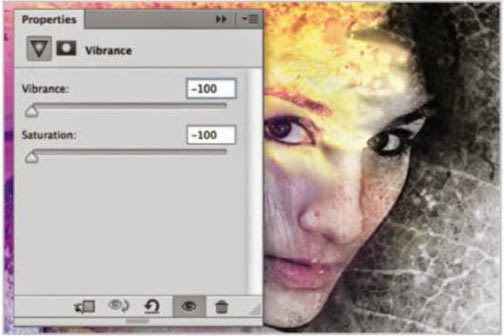
Click the Create New Adjustment Layer button in the Layers palette, and choose Vibrance. Drag both sliders to the left. Paint black in the upper left area to restore colour.


Darken with Overlay
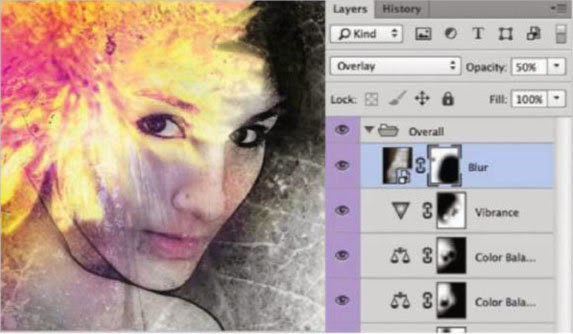
Place 'Blurjpg' from the supplied files. Set the blend mode to Overlay and drop Opacity to 50%. Add a layer mask and paint out some of the texture in the facial area and lower right quadrant.


Add some watercolour
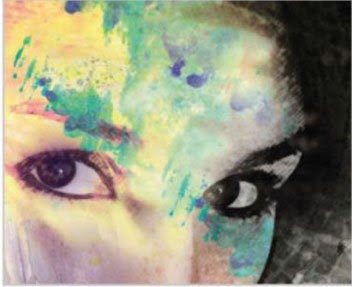
Place 'Watercolors_V1_1004jpg'. Situate to the right and confirm the place. Set the blend mode to Darken. Duplicate, move slightly to offset, apply a layer mask, and paint black to lessen areas.


More watercolour
Place'Watercolors_V1_1006jpg'. Enlarge slightly before confirming. Set the blend mode to Darken. Apply a layer mask and paint out the bottom and central areas. Duplicate, scale down, set to Darker Color, and paint black in the mask to reduce.


Colour Fill
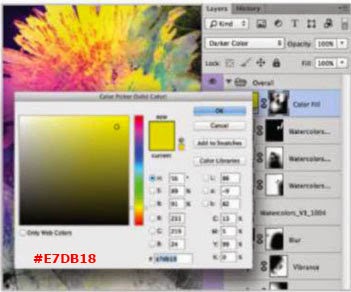
Click the Create New Fill Layer button in the Layers palette, choose Solid Color. Pick #e7db18. Change the blend mode to Darker Color. Paint black in select areas to remove colour.


Reinforce the model
Let's reinforce the model again. Make a duplicate of the background and move it to the top. Set the blend mode to Soft Light. OptionjAlt+click the Layer Mask icon. Paint white in various areas to beef up the woman's presence.


Cyan love
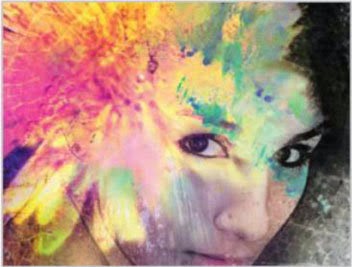
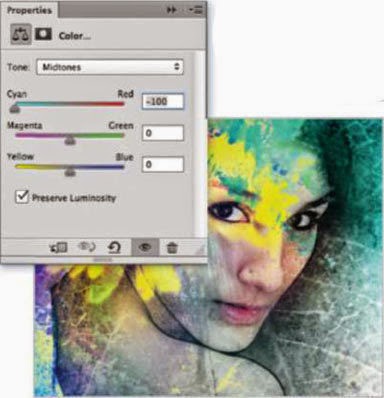
Click the Create New Adjustment Layer button, choose Color Balance. Set   Midtones Cyan/Red to -100. Paint black in areas to remove the cyan cast. Duplicate the adjustment layer twice and fi ne-tune the masks until satisfied.


All together now
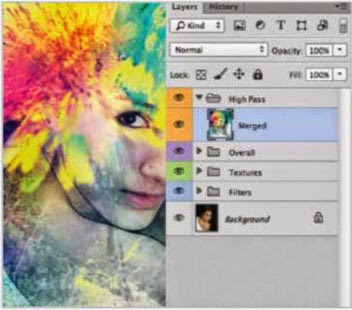
Wrth the top-most layer selected, press CmdjCtrl+Option/Alt+Shift+E. This will merge all layers into one and enable us to apply an effect such as a filter to the entire composite.


Sharpen with High Pass
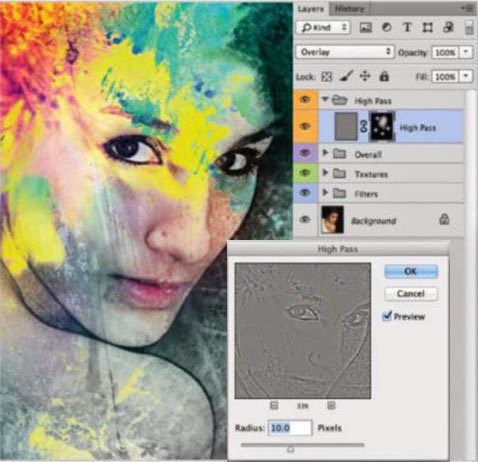
Goto Filter-Otheo+iigh Pass. Set Radius to 10.0 pixels, then click OK. Add a layer mask and paint black at the edges and anywhere else you want to remove sharpening.


Bulld a Fantasy Photo Composite


01 
STOCK SEARCH
The first step is to find some high-quality mountain stock images. The sky was white in our image and we wanted to add some clouds, so we searched for good sky photos, pasted them over the landscape, then blended using layer masks as well as the Overlay, Multiply and Normal modes.


02 
BRING IN SOME COLOUR
To add the green tint, create a new layer filled with #f6f6e5 and set to Multiply. Now create a new layer set to Multiply, but fill this with a bluish gradient at 36% Opacity. Use Curves to up the contrast and tweak the greens with a Color Balance adjustment layer


03 
MOUNTAINS AND BIRDS
Now add in some mountains from another stock photo. Set the layer’s blending mode to Multiply with an Opacity of 68%, then make the mountains a little greyer so that they all blend well together. Blur the mountains using the Gaussian Blur filter set to a Radius of 5px because they are further away and this will create a greater sense of depth. Finally, find some nice bird images and paste them into the composition, using the Edit>Transform options to match the scene’s perspective and scale.


04 
FLOATING MOUNTAINS
With the help of CGTextures, source some free landscape stock images and blend them together to produce a mountain reminiscent of those in Avatar. This is very much a matter of artistic licence so you will have to decide on the scale, shape and which materials constitute your mountain when you come to constructing it. As previously demonstrated, use layer masks to bring elements together, as this will help to blend effectively using black and white brushes. Also, make sure that when you are using these brushes that you are working with a low Flow value as this will help to achieve a smooth blend


05
GRADIENT SHADING
Select the floating mountain and, with a black to transparent gradient, create a shadow at the bottom of the scene, fading out towards the top of the image. Lower the Opacity to 28% and repeat this step. Select parts of the mountains from the background and paste into the bottom to give it more texture. We’ll go into more depth with this in a moment. At this stage, it’s a good idea to take a final look and check you’re happy with the composition. To do this, go to Edit>Transform>Flip Horizontal.


06 
DEPTH AND HIGHLIGHTS
To create depth and highlights, use a small, hard brush, painting with black where you want to generate a bit more shadow. Set this layer to the Soft Light blending mode and lower the Opacity to around 70% with the brush Flow at 70% too. Follow the same process with a hard white brush, this time creating highlights with the layer set to Overlay. You can use this technique with all your photomanipulation projects to great effect.


07 
ADD SOME CLOUDS
To add realism to the floating mountain and to establish its significant scale and airborne position, import some clouds, placing them around the bottom of the mountain. Render the clouds with channels, put them on a new layer and then invert it (Cmd/Ctrl+I). Now select the black parts (the clouds) with the Magic Wand tool and erase the rest. Blur the clouds with Filter>Motion Blur to lend them a greater sense of movement.


08 
SHADOWS, ACCENTS AND EERIE MIST
As this project goes on, and the more that you work on the mountain, the more likely you are to notice that it requires more details. At this stage, for example, we decided that this image needs more shadows and highlights. Repeat step 6 and go into more detail using a smaller brush. It’s time-consuming work, but this effort will pay dividends when it comes to the final result. To generate a mist effect, take a soft brush, sample the colour from the background with the Eyedropper tool, and brush over the mountain and background before switching to Soft Light blending.


09
ADD SOME PLANTS
In Avatar, the floating islands have long, vine-like plants to help people move from one island to another, and you can also create these in your scene. Take a hard brush and draw some simple lines to get the basic plant forms from one mountain to another. Then, with a green colour, add more lines over the first set and then a final group of lines in a lighter tone for shading. You can also set some of the lines to Overlay


10
MORE CURVE CHANGES
You can now add some shady plants to the bottom of the scene and around the base of the floating mountain. You can do this very simply by taking the hard brush again and, with a grey colour, drawing in plants that are hanging down. The trick is that they don’t have to look exactly like plants when zoomed in, but when you zoom out they should look convincingly like the silhouettes of trees or shrubs. You only have to make these plants as complicated as you want to


11 
ADDITIONAL HIGHLIGHTS
Once again you need to add more highlights – you can never get enough of them! The more you have, the more detail there will be in your scene and the better it will ultimately look. You can also add a bit of green here and there with a hard brush. By doing this you give the image a more digitally painted feeling, but don’t forget to make sure that everything blends well together, with no one area stealing the show


12 
MOUNTAIN EDGES
Because you could never render the rock in a way that makes the plants at the edges look good too, you need to add your own flora and fauna to the mountain edges. This will help to better blend the mountain into the sky and reduce that copy and pasted feel. Again, you don’t have to paint the plants or leaves very realistically as they’re in the distance and shrouded by mist. But be sure not to use only one colour when doing this – always add in highlight and  shadow tones too.


13
SPLASH OUT
Before making a waterfall, look up some references to get an idea of the basic structure. As you will see, there isn’t too much detail in a waterfall – it’s basically a white cloud. Take a soft brush at around 150px, brush a thick line in white and then apply Soft Light blending at 25% Opacity. This is the start of the waterfall and shows how it’s floating. You can now add a couple of finer lines either side of the waterfall to serve as edges.


14
WATERFALL DETAILS
With a soft brush sized around 500px, brush once more into the waterfall, but lower the Opacity to 28% and set the blending mode to Soft Light. For details, zoom in and use a hard brush to make a couple of small strokes and then, on a new layer, add a series of lines. If they look too hard, you can blur them a bit. Add vertical lines until satisfied, then apply some smoky mist underneath the cascade


15 
RAINBOW EFFECT
Waterfalls can often be seen with a rainbow near them due to light refracting through the moving water. Create a subtle rainbow with your hard brush, as per the screenshot, lowering the Opacity to 80%. Change the layer to the Soft Light mode and apply a Gaussian blur so that the rainbow doesn’t draw too much attention. With the soft brush set to the Soft Light mode, add a little more mist coming off the waterfall.


16
MOUNTAIN SHADOW
Because it’s a floating mountain, you need to add its shadow to the area it’s suspended over. We decided to put some shadow on the rocky column closest to it and on the ground using the soft brush set to black at a lowered opacity. Make sure you never do just one shadow – for realism, apply several layers of shadow that become darker the closer they get to the object. Don’t mess too much with the blending options when it comes to shadows, either, as they need to be almost completely black.


17
MORE MIST
As one of the final steps, you are going to add yet more mist around the floating mountain and make the vegetation around the edges a little greener. The mist will help the mountain merge seamlessly with everything else in the scene and it also enhances the surreal and mysterious mood you want the image to have. Never make your mist too white, though. Instead, use a colour in the same shade as the background, so in this case give it a green tint. Switch the mist layer to the Soft Light blending mode and set the Opacity to 30%


8 
FINAL TOUCHES 
Now you can play with Brightness/Contrast, Levels and Curves adjustment layers. To get focus in this artwork, you can also create a black to white radial gradient on a new layer set to Soft Light and 30% Opacity. The white circle goes wherever you want to draw focus. Create a new layer, fill it with black and go to Filter>Noise>Add Noise (12.5% and Monochromatic). Set this layer to Soft Light and just 5% Opacity. Last but not least, wrap up the image with a Smart Sharpen filter.